If you want to use Private Internet Access (PIA) for file sharing anonymity, especially if you have cheap internet, please make sure to activate the VPN Kill Switch-feature for maximum protection. In case of an unexpected disconnection, this will guarantee your privacy won’t be exposed.
Step 1: Signup for the service and install the software.
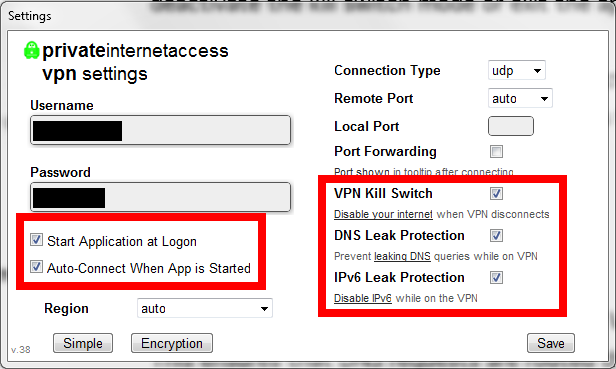
Step 2: In the client settings, enter your login information. Then click on “Advanced” in the bottom left corner, check the following settings and click “Save”:
 Note: We had a problem with the Internet Kill Switch (or the IPv6 Leak Protection as PIA thinks). If your Internet ever seems to be broken after using the software, follow these steps to fix the issue:
“Please right click on the icon for our VPN client, and click settings. Then click advanced, and disable the DNS leak protection setting. Then do the following:1. Go to Start2. Go to Control Panel3. Go to Network Settings4. Go to Network and Sharing5. Go to Change Adapter Settings6. Choose the Network Connection you were using.7. Right click and press Properties8. Go to the Network Properties9. Go to the TCP/IP v4 and select Properties10. Change the DNS to: 209.222.18.222 and 209.222.18.21811. Change the setting for Obtain an IP address to “Automatic”
This will re-enable your internet connection, and mimic the effects of the DNS leak protection setting while connected to the VPN.” PIA Support
